Want to connect CQG to your trading platform? Here’s a quick guide:
- Set up your CQG account: Obtain credentials from one of the best futures prop firms or your broker and sign the End-User License Agreement (EULA). For live accounts, use my.cqg.com; for demos, use demomy.cqg.com.
- Platform compatibility: Ensure your trading platform (e.g., MultiCharts, Sierra Chart, TradingView) supports CQG. Check for specific vendor labels and exchange activation with your broker.
- System requirements: Use a Windows system with at least 1 GB RAM, dual-core processor, and a high-speed internet connection. Open ports 2823 and 443 for data and authorization.
- Connection setup: Follow platform-specific steps to log in using CQG credentials. For custom setups, API integration options are available but require broker activation.
- Troubleshooting: Fix login issues by verifying credentials and server settings. Resolve data delays by reloading history or clearing local symbol files.
Pro tip: CQG only allows one active session per username. For simultaneous use on multiple platforms, request additional login IDs from your broker.
This guide simplifies everything you need to get started with CQG, from setup to troubleshooting.
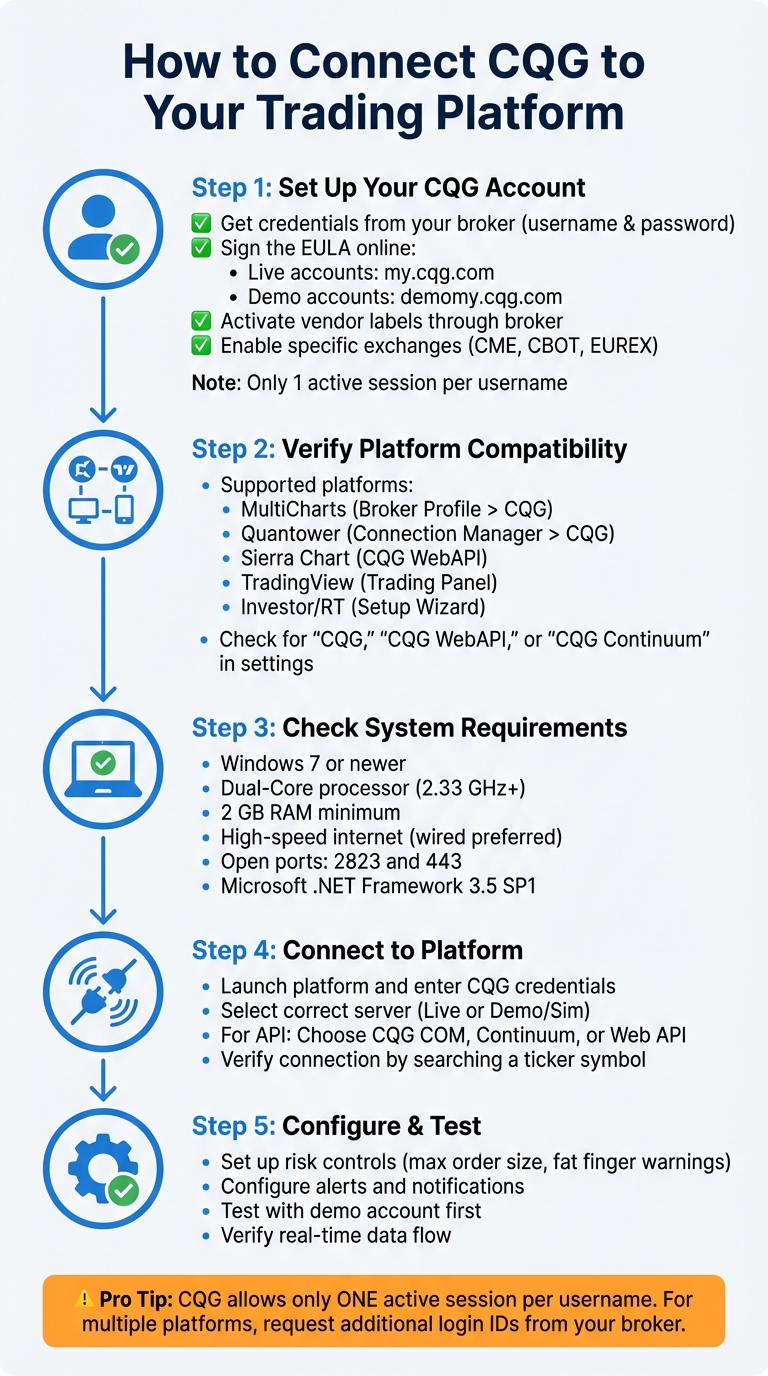
5-Step Process to Connect CQG to Trading Platforms
CQG data feed and broker setup in MultiCharts

sbb-itb-46ae61d
What You Need Before Starting
Before diving into connecting CQG to your trading platform, it’s essential to gather everything you’ll need and make sure your system is ready. Having all the requirements in place will make the setup process much smoother. Let’s start with setting up your CQG account.
Creating Your CQG Account
To connect, you’ll need valid CQG credentials provided by your broker, futures prop firm, or Futures Commission Merchant (FCM). These credentials – your CQG username and password – are not the same as your regular platform login details [6][7]. If you’re using brokers like AMP Futures, Optimus Futures, or StoneX, these credentials are typically sent to you via email after registering for a demo or live account.
You also need to sign the CQG End-User License Agreement (EULA) online to activate your connection [7][8]. For live accounts, head to my.cqg.com, and for demo accounts, use demomy.cqg.com. Without completing this step, even correct login details won’t work.
Additionally, you’ll need to activate the vendor labels required by your trading platform (e.g., "SierraChartData" for Sierra Chart or "LinnSoft" for Investor/RT). This step must be done through your broker [6][8]. Confirm with your broker that these settings are active before attempting to connect. Keep in mind that your broker also needs to enable specific exchanges, such as CME, CBOT, or EUREX, on your CQG account; otherwise, you won’t receive market data [6][8][10].
One limitation to note: CQG usually allows only one active connection per username [6][7][8]. If you try logging in from another platform, your first session will disconnect. If you need to use multiple platforms simultaneously, you’ll have to request an additional login ID from your broker. However, this often means paying exchange fees for each login.
Trading Platforms That Work with CQG
CQG integrates with popular trading platforms like MultiCharts, Quantower, Sierra Chart, TradingView, and Investor/RT [4][8][9][3]. Each platform has its own connection setup, so it’s important to verify compatibility beforehand.
| Platform | Connection Method | Key Requirement |
|---|---|---|
| MultiCharts | Broker Profile > CQG | Broker must configure your account for MultiCharts |
| Quantower | Connection Manager > CQG | Requires credentials from a broker like AMP Futures |
| Sierra Chart | Data/Trade Service > CQG WebAPI | "Connect to Market Data Server" must be set to True |
| TradingView | Trading Panel > Optimus Futures | Requires live or demo CQG credentials |
| Investor/RT | Setup Wizard > CQG Market Access | "LinnSoft" vendor label must be enabled by the broker |
To check compatibility, look for connection options labeled "CQG", "CQG WebAPI", or "CQG Continuum" in your platform’s settings. Keep in mind, if your account was initially set up for one platform, it might not work with another unless your broker reconfigures it [8].
For those using Investor/RT with a StoneX account, there’s a unique requirement: you must prefix your username with "StoneX:" when logging in (e.g., StoneX:YourUsername) [8].
Once you’ve confirmed compatibility, move on to reviewing system requirements to ensure smooth performance.
Checking Your System Requirements
After setting up your account and verifying platform compatibility, make sure your computer meets the necessary specifications for stable CQG performance. While CQG isn’t overly demanding, outdated hardware or a slow internet connection can lead to problems like data delays or disconnections.
| Component | Minimum Requirement | Recommended Specification |
|---|---|---|
| Operating System | Windows 8, 7, or Vista | Windows 7 or newer |
| Processor | Intel Pentium 4 3.0 GHz | Dual-Core Intel Core 2 Duo (2.33 GHz or higher) |
| Memory (RAM) | 1 GB | 2 GB |
| Hard Drive | 1 GB free space (7,200 RPM) | 4 GB free space (7,200 RPM) |
| Video Card | 128 MB memory | 128 MB per monitor |
| Internet | High-speed (DSL, Cable, Fixed Wireless) | High-speed (wired connection preferred) |
Your network also needs to allow traffic through port 2823 (for order routing and market data) and port 443 (for authorization) [11]. If you’re using a corporate network, you might need to ask your IT team to open these ports.
Another key requirement: Microsoft .NET Framework 3.5 SP 1 must be installed on your computer [11]. Most modern Windows systems already include this, but if you’re running an older setup, you can download it from Microsoft’s website.
When installing the trading software, right-click the installer and select "Run As Administrator" to ensure all components are properly registered [8]. Also, disable power-saving features like hibernate and standby modes on your computer, as these can cause unexpected connection drops during trading hours [11].
How to Connect CQG to Your Trading Platform
With your account and system ready, the next step is connecting CQG to your trading platform. While the details may vary depending on the method, the core steps are fairly simple. Here’s a breakdown of the main connection types.
Using CQG Integrated Client
Start by launching the CQG Integrated Client and logging in with your CQG credentials. Look for the Application toolbar in the top-left corner – this is where you’ll find trading interfaces like DOMTrader or the Orders and Positions window.
By default, the system operates in demo mode. To switch to live trading, open any trading interface, click Setup, and uncheck Demo trading. At this point, you’ll need the specific login credentials provided by your clearing firm or one of the top futures prop firms, as these are different from your CQG system login.
To confirm the connection, search for a ticker symbol (e.g., EP or ENQ). If you see real-time data, your connection is active. Keep in mind that only one active connection per username is allowed at any given time.
For users of CQG QTrader, the setup process is quite similar, ensuring consistency across platforms. This setup is a standard requirement for many traders using futures prop firm guides to evaluate their connectivity options.
Connecting CQG QTrader
The setup for CQG QTrader mirrors that of the Integrated Client and requires the same system specifications. You’ll need trading account credentials from a supported FCM partner, which are typically sent to you via email after registration [14][12].
Make sure that ports 2823 (for market data/order routing) and 443 (for authorization) are open. To verify your connection, open the DOM Trader and search for a symbol. If data populates, your connection is active [3].
For live accounts that require historical data on expired contracts, go to your connection settings and enable the option for "Request continuation history" [3]. This feature allows access to historical contract data, which is useful for backtesting or analysis.
API Integration for Custom Solutions
For traders needing custom connectivity, CQG supports API integration in addition to the standard client setups. There are three API options: the Data API for market data, the Trading API for order routing, and the Charting API for creating custom analytics [1]. However, API access isn’t enabled by default – you’ll need to contact your broker to request activation and obtain your login credentials, including Login, Password, and Server Address [15][13].
Your broker must also configure your account through the CQG CAST back-office system to enable the specific platform ID you’ll be using [16]. You can choose from three connection methods:
- CQG COM, which connects via a locally installed CQG Integrated Client
- CQG Continuum, which connects directly to the CQG server without requiring local installation
- CQG Web API, used by platforms like MultiCharts for web-based integration [15][13]
Before starting API development, confirm with your broker that your account is configured for the API you plan to use. Accounts set up for one platform may not work with another without reconfiguration [13]. Also, avoid using the same CQG API account on multiple applications simultaneously, as this can lead to data conflicts and connection issues [13][16].
Adjusting CQG Settings for Better Performance
Once you’ve established your connection, it’s time to fine-tune your CQG workspace. Customizing the platform’s visual and functional settings can streamline your workflow and help you avoid costly errors.
Setting Up Charts and Display Options
CQG allows you to personalize nearly every visual aspect of your workspace. You can adjust themes, trading colors, and price displays to match your preferences and enhance usability [19]. For quicker chart navigation, use a simple shortcut: type a comma followed by an interval abbreviation. For instance, ",1" switches to a 1-minute chart, while ",d" brings up a daily chart [21].
Window linking is a game-changer for traders juggling multiple widgets. Assign a link color to your widgets, and you can sync the same symbol across all linked windows with a single action [21]. If you’re trading agricultural or fixed income contracts, enabling fractional pricing separators in the Interface section of Preferences can make prices easier to interpret [19].
The Orders and Positions (O&P) display is another area where customization can boost efficiency. You can decide which panels to show – like Orders, Account Summary, or Filter – and choose from dozens of columns, such as Average Fill Price, Order Strategy, or Net Change prices [18]. For those managing multiple accounts, linking the Account Summary widget to the Orders widget allows you to filter all views by selecting a single account [21].
Once your display is set, it’s time to configure risk controls to safeguard your trades and simplify order management.
Configuring Risk Controls and Order Settings
To manage risk parameters, click the Setup button and select Trading Preferences [20]. Here, you can set maximum order and position sizes for your key symbols. These limits act as a safeguard, issuing warnings if you try to exceed them [22].
The Fat Finger warning is another essential tool. It alerts you if you accidentally input an order quantity that exceeds your predefined threshold, helping to prevent costly errors [23]. Adjust the Stop Limit Offset to define the limit price when a stop is triggered, and use the Range setting to get alerts if buy orders are placed too far above the market price or sell orders too far below [22].
| Risk/Order Setting | Function | Benefit |
|---|---|---|
| Maximum Order Size | Warns if an order exceeds a set quantity | Prevents oversized accidental entries [22] |
| Fat Finger Warning | Alerts for unusually large quantities | Reduces risk of mistyped orders [23] |
| Range Warning | Flags orders placed far from the current price | Avoids poor fills from accidental clicks [22] |
For added security, consider using server-side Bracket Orders. These automatically place both a target profit and a stop-loss order once your entry is filled. Since they’re managed on the server, they stay active even if your platform disconnects [21]. If you’re trading high stakes, enable Order Review or Order Preview dialogs to double-check details before orders are sent to the exchange [23].
With your risk settings in place, it’s time to set up alerts to stay on top of market changes.
Enabling Alerts and Notifications
In Trading Preferences, navigate to the Notifications tab [20][23]. CQG offers several notification styles to suit different workflows. For example:
- Pop up: Displays a modal dialog for each message.
- Pop under: Shows an icon in the Status Bar without interrupting your work.
- Pop under with preview: Displays a brief bubble message above the notification icon [23].
If you’re engaged in high-frequency trading, non-intrusive options like "Pop under" or "Pop under with preview" are ideal [23]. For "Pop up" alerts, ensure the "Allow trading while notification box is visible" option is enabled; otherwise, you’ll need to manually close the alert before continuing to trade [23].
You can also activate email alerts for live or paper trading. These can notify you of new fills, order placements, cancellations, rejections, or suspensions [23]. For audible alerts, enable the "Sound Board" in Miscellaneous System Preferences and add the Sound Board icon to your header bar [17].
Fixing Common Connection Problems
Connection hiccups can throw off your trading workflow, but most CQG issues fall into predictable patterns. Tackling them quickly can help you get back on track with minimal interruption.
Solving Login and Connection Failures
Login failures are often tied to credential or server mismatches. For demo accounts, ensure the "Server" or "Connectivity" field is set to "Sim" or "Demo." For funded accounts, select "Live." Even with the correct credentials, using the wrong server will block access.
Keep in mind, CQG only allows one active session per account. Logging in on a second device will automatically disconnect the first. If you receive the message, "This account is only allowed to liquidate open positions", it means your broker has applied restrictions – likely due to loss limits or other administrative reasons. In such cases, reach out to your broker directly for clarification, or check our Apex Trader Funding FAQ if you are using that provider.
For API connections, Error 105 indicates your account isn’t authorized for data retrieval via the CQG API. Contact CQG Customer Support to enable the required permissions. For CQG COM connections, Errors 125 and 166 suggest the CQG Integrated Client (CQGIC) isn’t running. To resolve this, start the local CQG Integrated Client and log in before attempting to reconnect.
| Error Code | Description | Recommended Action |
|---|---|---|
| 105 | Not authorized for CQG API | Contact CQG Customer Support to enable API access |
| 125 | CQGIC not running | Start the local CQG Integrated Client |
| 166 | Connection to CQGIC failed | Verify that CQG software is running and not blocked by a firewall |
| 167 | Version mismatch | Update both the trading platform and CQG API/Client components |
| 202 | Not logged into CQG Gateway | Re-enter credentials and confirm the gateway is active |
Once login issues are sorted, you can turn your attention to data and sync-related problems.
Fixing Data Delays and Sync Issues
Chart gaps or incorrect data often stem from weak internet connections or corrupted local symbol files. To address this, right-click on the chart and select "Reload history (server)" to re-sync with CQG servers. This action will fill in missing data and correct any discrepancies [24].
If your connection drops frequently, check the "Allow Server to Drop Data" setting in platforms like Sierra Chart. Set it to False to ensure all market data is transmitted. However, if bandwidth issues cause disconnections, setting it to True allows the server to drop unprocessed data packets, which can improve stability [4].
For missing symbols or sync failures, clear the platform’s Temp folder and delete the local CQG symbol folder. Then, confirm that the relevant exchange (e.g., CME, CBOT) is activated in your connection settings [24].
Custom integrations can sometimes experience delays due to memory overload. This happens if "Current Notify" ticks are requested without limits or if inefficient event handlers create backlogs in the event queue [[26]](https://partners.cqg.com/sites/default/files/docs/CQGAPI_4.0R/Frequently Asked Questions.html). Optimizing your event handlers and isolating them from other functions can help. If you encounter Error 313, it means you’ve exceeded the CQGIC traffic limit. Reducing the number of tracked symbols or depth-of-market (DOM) windows can resolve this [[25]](https://partners.cqg.com/sites/default/files/docs/CQGAPI_4.0R/Error Codes.html).
If problems persist with custom integrations, you may need to dig deeper into API error troubleshooting.
Resolving API Connection Errors
Many API errors are linked to missing permissions. Errors 105 or 203 suggest your account isn’t set up for API access [[25]](https://partners.cqg.com/sites/default/files/docs/CQGAPI_4.0R/Error Codes.html)[[26]](https://partners.cqg.com/sites/default/files/docs/CQGAPI_4.0R/Frequently Asked Questions.html). Contact CQG Customer Support or your broker to enable features like API Streaming, Trading, or Historical Data.
For CQG COM or CQG Trader API connections, ensure the local CQG Integrated Client is running and logged in. If you’re using CQG Trader, you’ll need to manually enable the API. Right-click the quote display title bar, choose API, and select Enable API.
If you see Error 167, it means there’s a version mismatch between the API and the installed CQG software. Update both components to compatible versions.
Error 196 indicates you’ve hit the maximum number of API instances (usually capped at 10). To fix this, close any unused API instances to free up slots [[25]](https://partners.cqg.com/sites/default/files/docs/CQGAPI_4.0R/Error Codes.html)[[26]](https://partners.cqg.com/sites/default/files/docs/CQGAPI_4.0R/Frequently Asked Questions.html).
For CQG Continuum (WebAPI) connections, double-check that you’re using the correct server address provided by your broker. Unlike CQG COM, this method connects directly to the server, so no local client installation is needed.
If the API struggles to locate symbols or returns incorrect data, clear the Temp folder in your platform’s main directory and delete the CQG subfolder. This forces a re-download of symbol files, which often resolves the issue.
Where to Get Help and Additional Resources
If you’re still facing connection issues after troubleshooting, here are some resources to get additional support.
CQG Support Channels and Documentation
CQG provides several support options to help resolve technical problems effectively. You can use Live Chat within the CQG Integrated Client or QTrader, available from Sunday 2:30 p.m. CT to Friday 5:00 p.m. CT [27]. For more complicated issues, reach out via Phone Support or Remote PC Support during the same hours – just make sure to contact support before initiating a remote session [27].
If you’re dealing with advanced features or need help with custom integrations, a CQG Product Specialist can assist [27]. For detailed guides on system specifications, order types, and symbols, visit help.cqg.com [27]. Developers can also explore the CQG API 4.0 Revised documentation, which includes a Quick-Start Guide, FAQs, and sample code in C#, C++, and VBA [32][2].
"Call your FCM or clearing firm if you have questions regarding trading. Contact CQG Customer Support if you have questions regarding CQG software." – CQG Support Resources [28][29][30]
For self-directed learning, access CQG’s Training Library, YouTube channel, and forums. You can also click the Page button within the software to view live tutorials on building custom workspaces [28][29][30].
These resources provide direct assistance to complement earlier troubleshooting steps.
DamnPropFirms Tools and Prop Firm Reviews
Once you’ve resolved your CQG connection issues, DamnPropFirms can help you find the best futures prop firm to fund your trading. The platform offers verified reviews of top firms like Apex Trader Funding, which features a 90/10 profit split [5]. You can also find reviews for Take Profit Trader, Tradeify, and other firms compatible with CQG-supported platforms like NinjaTrader and Tradovate [5][33].
The Consistency Rule Calculator on DamnPropFirms is a handy tool for navigating evaluation requirements like Apex’s 30% or 50% consistency rules, ensuring you avoid payout issues during high-performance trading sessions [31][5]. Additionally, firms such as Lucid Trading, Tradeify, Legends Trading, and Purdia Capital offer instant funding, so you can start trading live capital without delay. Reviews also highlight firms that provide free professional data feeds, like Rithmic or Tradovate, which can save you $100–$150 per month in data fees [5].
Conclusion
Once your setup is configured and running smoothly, it’s essential to streamline your process. Connecting CQG to your trading platform involves three key steps: obtaining valid credentials, selecting the correct server (Sim or Live), and verifying the connection through your platform. Proper configuration not only prevents order rejections but also ensures data accuracy and protects your capital with automated risk management tools. With a live CQG account, you’ll typically have access to 30 days of tick data, 3 months of minute data, and 3 years of daily data – plenty of historical information for effective backtesting and analysis [13][3].
If you encounter persistent issues, reach out to your broker or consult CQG’s documentation. Additionally, avoid logging into your account from multiple devices simultaneously to prevent conflicts.
Once your connection is stable, consider exploring additional tools and resources to elevate your trading experience. For instance, DamnPropFirms provides verified reviews of futures prop firms to help you make informed decisions. They highlight firms like Apex Trader Funding, which offers an impressive 90/10 profit split and has distributed over $600 million to more than 50,000 funded traders as of March 2026 [5]. You can also use their Consistency Rule Calculator to better understand evaluation requirements and avoid potential payout issues.
For traders looking to dive into the market immediately, Tradeify offers instant funding options, allowing you to start trading live capital without delay. By maintaining a stable connection and partnering with the right prop firm, you can maximize your trading potential while keeping data costs in check.
FAQs
Why won’t my CQG login work on my platform?
If your CQG login isn’t working, it could be due to a few common issues: incorrect credentials, internet problems, or account restrictions. Start by double-checking your User ID and Password for accuracy. Next, confirm that your internet connection is stable and functioning properly.
Also, make sure your account is active and correctly set up for the platform you’re using. If the problem continues, review your connection settings to ensure everything is configured correctly. Still stuck? Reach out to customer support for assistance or verify with your broker that your account is ready to use with CQG.
How do I use CQG on two platforms at once?
To use CQG on two platforms at the same time, you’ll need to set up separate connections for each. Typically, most CQG accounts allow only one session per login. This means if you log in on a second platform, the first session will likely disconnect.
To work around this, you can:
- Check with your broker to see if they support multi-session logins.
- Set up separate CQG accounts with different login credentials.
It’s always a good idea to confirm the specific policies with your broker or CQG provider to ensure everything runs smoothly.
Which CQG server should I pick (Demo vs Live)?
When deciding on a CQG server, think about your trading objectives. The Demo server is perfect for practicing and trying out simulated trades without putting any real money on the line – making it a great choice for beginners. On the other hand, the Live server is designed for trading with real funds, giving you access to all available symbols and features. In short, use the Demo server for testing and learning, and switch to the Live server when you’re ready to trade for real.